Blue and Gray Crochet Sock Monkey Hat Pattern
Crochet Sock Hats
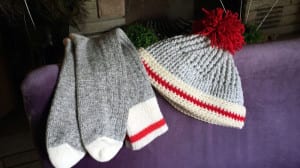
My sock hat is inspired by work socks. They remind me a lot of my dad as he is one of the hardest working people I know. I know my work ethics from my dad with the creativity inspired by my mom. Looking at these socks, it reminds me of seeing these in the hamper when I was exceptionally young. I remember him leaving the house in the dark in the morning to go to work.
Today, we are seeing these types of clothing in the mainstream stores that are in hats, scarves, mittens and sweaters. Being a crocheter, I would prefer to wear a crochet version to show off my own skills.
For my design, I decided to put in ribbing as there is ribbing in the original socks.
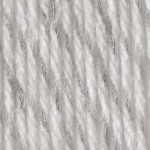
While in the store, I clued in that Bernat Super Value has a colour in the collection called Grey Ragg. I thought to myself, I think I can make my own and keep true to the colours of the inspired sock pattern.
As you can see from my picture, my design is very close to allowing others to think it's authentic.
The other two colours are Bernat Super Value, Natural and Bernat Super Value, Berry.
Crochet Sock Hats

Pattern Suggestions
- American Flag Baby Crochet Blanket Pattern
- Crochet Cosmetic Bag Pattern
- Crochet Double Layered Round Scrubby + Tutorial
- Crochet Dog Coat + Tutorial
- The Blue Lagoon Afghan + Tutorial
Materials
- One Skein Bernat Super Value Grey Ragg
- One Skein Bernat Super Value Berry
- One Skein Bernat Super Value Natural
- Size H, 5 mm Crochet Hook
All Sizes
My hat was originally designed for myself, an adult male, but I know my fans are going to want to do this in other sizes. For the benefit of my followers, I have spent several hours researching the sizes and stitch counts for my design so that it can be altered. Sizes available are from Newborns to Adult Male.
The trick to this design is to understand that the ribbing effect is the growth of the hat. Once the hat hits the stitch count you need for the size, the ribbing stops and the crocheter will then complete the remaining hat as prescribed which should go down to the bottom of the ear. The brims are characteristic of the sock hat, acting like a cuff for my inspired design.
The pom pom is optional. I think it adds a bit of flair and I am a lover of pom poms too.
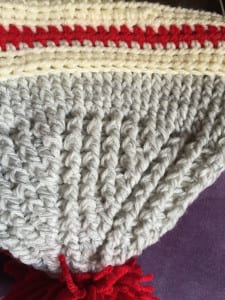
Understanding the Ribbing & The Pie
When looking down from the top, the hat is in 6 pie shapes. The growth of this hat is done within each of the pie shapes that are each identical to each other within around.
You will not see any slip stitching. I designed this had as a continuous round that you will need to move a stitch marker as you progress.
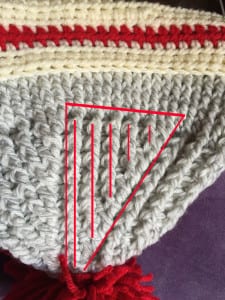
The growth of the pie happens in the first stitch of each of the rounds which gives the start of each pie the angle in which the finishing of the pie shape stays straight. Once you have established the back post double crochet stitches, you will notice the ribbing follows suit all the way down. It's easy to follow.
There are only two ways to start the ribbing once the ribbing is established in round 3. Round 4 and 5 have the starting techniques that are shown in the diagram below.
For example:
Round 4
- *2 FPDC (Front Post Double Crochet) in the first stitch, FPDC in next stitch, BPDC (Back Post-Double Crochet) in next stitch. Pie is finished. *Repeat for next pie.
Round 5
- *2 FPDC (Front Post Double Crochet) in the first stitch, BPDC in next stitch, FPDC in next stitch, BPDC in final stitch. Pie is finished. *Repeat for next pie.
- This round breaks apart the 3 FPDC that were created in the previous round to established a new rib that will extend down.
The difference of all remaining rounds in the ribbing is that what happens after the red highlighted area above is just about maintaining what you can already see. If you see an FPDC, you will match it with an FPDC. Same rule for BPDC, just match it until you get to the next pie shape.
Each pie shape gets bigger so there are more stitches to do.
Round 6
- *2 FPDC in the first stitch, FPDC in next stitch, BPDC in next stitch. FPDC in next, BPDC in final stitch. Pie is finished. *Repeat for next pie.
Crochet Diagram
View, Download or Print my Crochet Diagram. Crochet Sock Monkey Inspired Hat, Crochet Diagram.
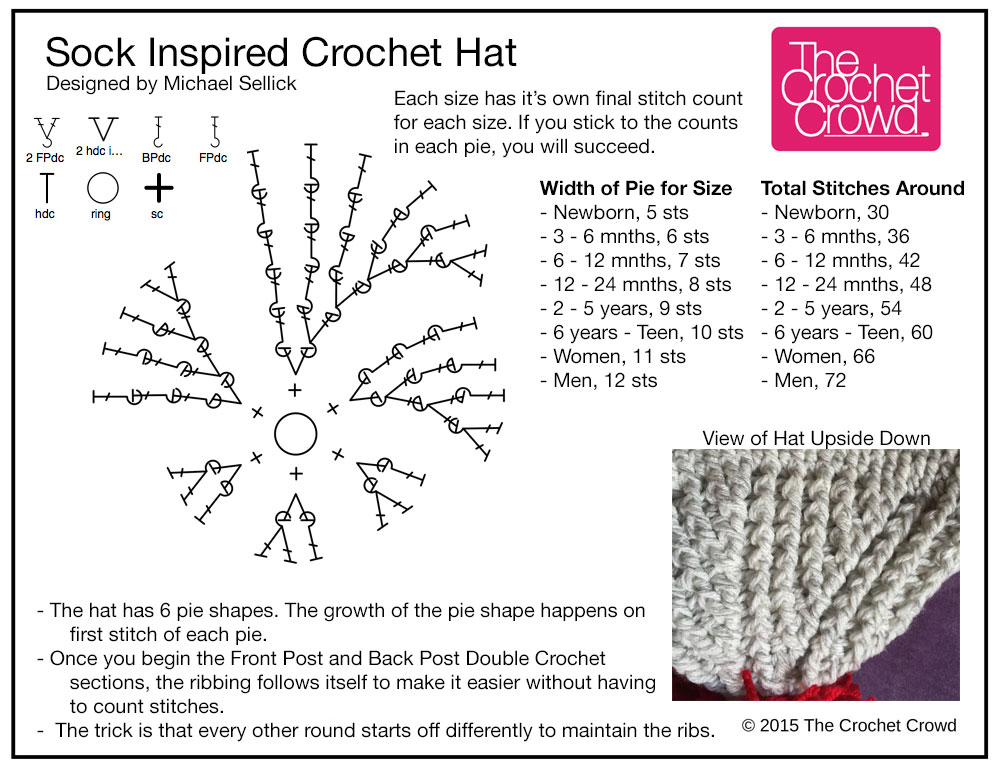
Sizes and Stitch Counts
I have calculated the stitch counts and sizing you will need to accomplish each of the sizes.
Pie Shape Stitch Counts
- Newborn, 5 sts = 30 stitches
- 3 – 6 months, 6 sts = 36 stitches
- 6 – 12 months, 7 sts = 42 stitches
- 12 – 24 months, 8 sts = 48 stitches
- 2 – 5 years, 9 sts = 54 stitches
- 6 – teens, 10 sts = 60 stitches
- Women, 11 sts = 66 stitches
- Men, 12 sts = 72 stitches
Height, Crown to Bottom of Ears
This is the height before starting the brim.
- Newborn. 5.5″
- 3 – 6 months, 6″
- 12 – 24 months = 7″
- 2 – 5 years, 7.5″
- 6 – teen, 8.5″
- Women, 9″
- Men, 9.5″
Pattern
Written for Men's Size and I have indicated where to stop if doing any of the smaller versions.
This pattern is done in a continuous revolution to prevent slip stitching. You will need to move your stitch marker as you complete around to ensure you keep an accurate count. I haven't written that instruction in each line as you need to do it automatically.
- Using Bernat Super Value, Grey Ragg.
- 5 mm, Size H Crochet Hook.
Hat Start and Pie Growth
- Created a Magic Ring, 6 sc into ring. Do not slip stitch. Mark final stitch with a stitch marker. – 6 sts
- Starting on the first sc, 2 hdc into each stitch around. – 12 sts (2 sts per pie)
- *2 fpdc in first stitch, 1 bpdc in next. Repeat * around. – 18 sts (3 sts per pie)
- *2 fpdc in first stitch, 1 fpdc in next, 1 bpdc in next. Repeat * around. – 24 sts (4 sts per pie)
- *2 fpdc in first stitch, 1 bpdc in next. 1 fpdc in next, 1 bpdc in next. Repeat * around. – 30 sts (5 sts per pie) Newborn stop here move to next section.
- *2 fpdc in first stitch, 1 fpdc in next followed by bpdc, fpdc, bpdc. Repeat * around. – 36 sts (6 sts per pie)3 – 6 months stop here move to the next section.
- *2 fpdc in first stitch, 1 bpdc in next. followed by fpdc, bpdc, fpdc, bpdc. Repeat * around. – 42 sts (7 per pie) 6 – 12 months stop here move to the next section.
- *2 fpdc in first stitch, 1 fpdc in next followed by bpdc, fpdc, bpdc, fpdc, bpdc. Repeat * around. – 48 sts (8 sts per pie) 12 – 24 months stop here move to next section.
- *2 fpdc in first stitch, 1 bpdc in next. followed by fpdc, bpdc, fpdc, bpdc, fpdc, bpdc. Repeat * around. – 54 sts (9 per pie) 2 – 5 years stop here move to next section.
- *2 fpdc in first stitch, 1 fpdc in next followed by bpdc, fpdc, bpdc, fpdc, bpdc, fpdc, bpdc. Repeat * around. – 60 sts (10 sts per pie) 6 years – teeen stop here move to next section.
- *2 fpdc in first stitch, 1 bpdc in next. followed by fpdc, bpdc, fpdc, bpdc, fpdc, bpdc, fpdc, bpdc. Repeat * around. – 66 sts (11 per pie) Women stop here move to next section.
- *2 fpdc in first stitch, 1 fpdc in next followed by bpdc, fpdc, bpdc, fpdc, bpdc, fpdc, bpdc, fpdc, bpdc. Repeat * around. – 72 sts (12 sts per pie) Men stop here move to next section.
Next Section
The growth portion of your hat is now done. It will appear small but as you crochet the next 3 – 4 revolutions, it will continue to grow and then start to stabilize to the correct sizes.
- 1 fpdc in each stitch around. Continue to move your stitch marker so you can ensure you are keeping an accurate count of your revolutions.
- Using the measurements below, continue to do the fpdc in each round until the length of the top of the hat to the brim has the same measurements.
- Final 4 stitches of the final round should be slip stitches as this is the end of the continuous rounds for this project.
This is the height before starting the brim.
- Newborn. 5.5″
- 3 – 6 months, 6″
- 12 – 24 months = 7″
- 2 – 5 years, 7.5″
- 6 – teen, 8.5″
- Women, 9″
- Men, 9.5″
Brim
Now that your height is correct to the measurements you want. You can also try on the hat if you want to customize it before starting the brim.
Join the Bernat Super Value, Colour is called Natural.
- Ch 1, sc in each stitch around. Slip Stitch to join. Move to the next appropriate instruction.
Baby – 5-Year-Old Sizes – Smaller Brim 3 rounds
- Ch 2, 1 HDC in front loop of each stitch around. Join with a slip stitch. Fasten off Natural.
- Using Bernat Super Value, Berry Red. Fasten on, ch 2. 1 HDC in each stitch around. Fasten off.
- Fasten on Natural, Ch 2, 1 HDC in each stitch around. Fasten off.
6 – Adult Sizes – Brim as Shown in Picture – 5 rounds
- Ch 2, 1 HDC in front loop of each stitch around. Join with a slip stitch.
- Ch 2, 1 HDC in stitches around. Join with a slip stitch and fasten off.
- Using Bernat Super Value, Berry Red. Fasten on, ch 2. 1 HDC in each stitch around. Fasten off.
- Fasten on Natural, Ch 2, 1 HDC in each stitch around. Join with a slip stitch.
- Ch 2, 1 HDC in each stitch around. Join with a slip stitch. Fasten off.
Video Tutorial Below
More Crochet Hat Pattern Ideas
Sort By
- Date
- Title
- Popular post
Sort By
- Date
- Title
- Popular post
Source: https://thecrochetcrowd.com/crochet-sock-hats-all-sizes/
0 Response to "Blue and Gray Crochet Sock Monkey Hat Pattern"
Post a Comment